Blind Riveting Design Guide
Table of Contents
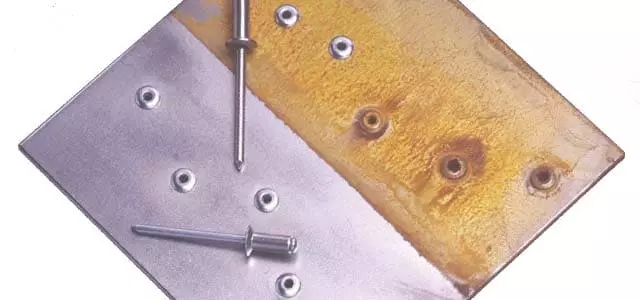
Blind riveting is a simple operation that does not require back support. It is widely used in various fields such as sheet metal connections and shell structures. In actual engineering, blind rivets directly affect the strength and assembly consistency of the entire structure. The key parameters for riveting connections during the design stage are of great significance. These include aspects such as the accuracy of hole positions, the selection of rivet types, the matching of rivet head shapes, and the layout method (such as spacing and arrangement direction). If these are overlooked, it is highly likely to result in the following problems:
- Structural failure or loose connections
- Accelerated expansion of fatigue cracks
- Interference or mismatch during installation
- Affecting the service life and safety of the product
Therefore, developing a professional and systematic Riveting Design Guide is of vital importance for ensuring structural stability, enhancing assembly efficiency, and reducing the risks of later maintenance. This article will delve into the key technologies in blind riveting design from aspects such as design points, material selection, and mechanical analysis. It aims to assist engineers in avoiding potential problems at an early stage and creating a more reliable connection system.
Fundamentals of Blind Riveting Design Based on Mechanical Principles
Blind riveting is a non-detachable connection method widely used in aviation, automobiles, electronics and sheet metal structures. Its structural design must be based on precise mechanical principles to ensure long-term reliability and safety. The following explains the key design points starting from the force mechanism, which is applicable to structural engineers, product developers and quality engineers.
Analysis of the Force Mechanism
- Shear Load Concentration
In most applications, rivets mainly bear shear loads. Blind rivets, due to their closed structure at one end, usually have an incompletely symmetrical shear surface. This may cause shear stress to concentrate in the area close to the point where the rivet rod breaks. If the hole position is improperly designed, it can easily lead to local yielding or the accumulation of micro-cracks, thereby weakening the connection strength. - Tensile Load Path
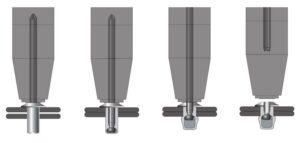
When subjected to tension (such as when a sheet is pulled apart along the vertical direction), the blind rivet converts the tension into the clamping force between the two plates through its “pulling pin tail ball head”. However, the tension path is long, which makes it prone to causing slight deformation along the axial direction of the rivet. If the fit between the rivet rod and the hole is too loose, it may result in micro wear. - Impact of Fatigue Cycles
Under repeated loads (such as vibration or periodic forces), the riveted area becomes a region with high stress concentration, especially when there is a gap between the rivet rod and the hole wall. Fatigue cracks often originate from the edge of the hole or the clamping surface. Therefore, a reasonable design of pre-tightening force and control of hole spacing are the key to improving fatigue life.
Key Points of Structural Design
- Rivet Pattern
The rivets should be evenly distributed along the load path to avoid interruption or premature change of the force flow. Usually, a “trapezoidal” or “rhombic” arrangement is adopted to achieve stress diffusion. Although continuous linear arrangement is convenient for assembly, it may result in concentrated force. The arrangement should be optimized according to the actual load direction. - Pitch and Edge Distance
- Pitch: It should be greater than 2.5D (D is the diameter of the rivet), to prevent the overlapping of the cutting surfaces and the resulting material tearing.
- Edge Distance: It is recommended to be ≥ 2D, to avoid edge cracks or edge deformation, especially in low-strength materials such as aluminum and magnesium, where caution should be exercised.
- Load Path Architecture
It is necessary to ensure that the force flow of all connection nodes is continuous, and avoid “floating” or “bridging” designs. For example, using triangular reinforcement plates combined with blind rivets at structural corners to distribute the load can effectively prevent stress concentration. - Distribution of Force Direction
Bolt connections are best used for connections in the direction of shear, avoiding applications where axial tension is the main force. If tension is unavoidable in the design, structural reinforcements (such as washers, conical seats) should be used to enhance the tensile resistance.
Key Design Parameters for Reliable Blind Riveting
When conducting the blind riveting design, the structural strength, durability and manufacturing feasibility all depend on a series of detailed parameter designs. The following explains five key elements, providing professional suggestions based on actual working conditions. Ensure stable connection quality, reasonable stress distribution, and reduce the risks of corrosion and fatigue.
a. Bolt Type, Rod Diameter and Grip Range
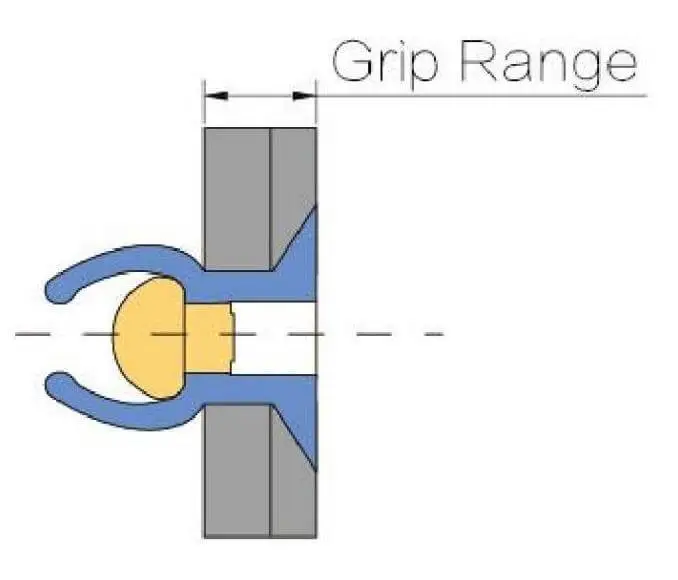
How to Choose the Appropriate Rivet Grip Range
The “holding range” refers to the total thickness of the material that the rivet can effectively grip (the combined thickness of the two plates). It is necessary to ensure that the total plate thickness falls within the middle value of the selected rivet’s Grip Range plus or minus 10%. If it is too small, it will result in unstable gripping; if it is too large, it will create a blind end residual gap, causing the structure to loosen.
The influence of rod diameter on shear/tear strength
The shear strength of the rivet is in a square relationship with the diameter of the rod, while the drawing strength is affected by the shape of the head and the deformation form at the tail. For example:
- 3/16″ (4.8 mm) aluminum rivets have a shear strength of approximately 800 – 1,000 N
- 3/16″ stainless steel rivets can achieve a shear strength of over 2,000 N (The specific values should be referred to the manufacturer’s data sheet.)
In the design process, an appropriate rod diameter and material should be selected after the load direction is clearly defined.
b. Hole Diameter and Fit Tolerance
The Influence of Hole Size on Tensile Force and Clamping Effect
An excessively large hole size will result in “empty motion” under axial force, leading to micro-movement wear; while a too small bore diameter is prone to causing installation difficulties or compression damage. The correct hole size design should be slightly larger than the rod diameter, allowing for a smooth insertion while ensuring good contact.
Suggested Aperture Margin
- The recommended range is bolt rod diameter +0.003″ to +0.005″ (0.08—0.13 mm)
- For stainless steel materials or precision structures, it can be controlled to +0.002″
It is essential to prevent the formation of burrs or elliptical deformations on the hole walls, as these can significantly reduce the fatigue life.
c. Layout Parameters: Edge Distance, Center Distance and Line Spacing
Recommendation Ratio Rule
- Edge Distance (Margin) ≥ 2D: Prevents edge materials from tearing, especially in soft metals such as aluminum.
- Pitch (Center Distance) ≥ 3D: Avoids overlapping of the cutting surface or stress concentration.
- Row Spacing (Row Distance) ≥ 2.5D: Ensures structural integrity when multiple rows of rivets are used.
Asymmetric Force Flow Design Suggestions
For structures with non-uniform load directions (such as trapezoidal connection areas), offset arrangement or “interlaced layout” should be used to distribute the stress. For example, by staggering the middle row by half a pitch to form a triangular grid, the fatigue life can be increased by more than 30%.
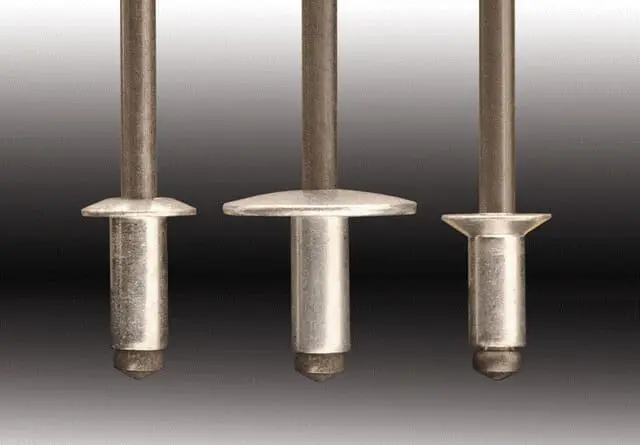
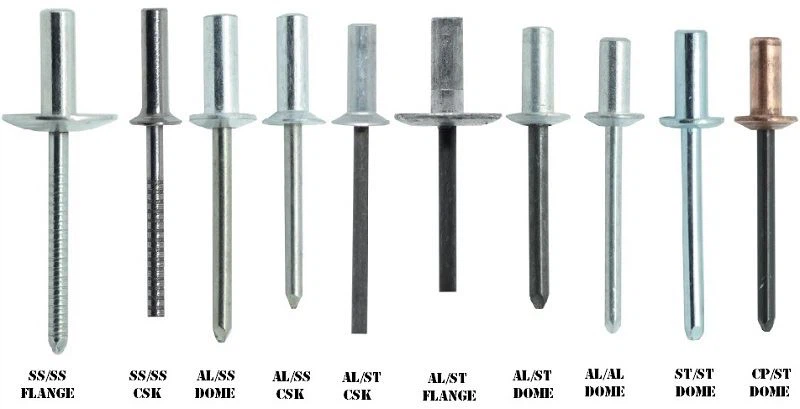
- Dome Head (Round Head): Universal type, with moderate contact area, suitable for most metal plate connections
- Countersunk Head (Sunk Head): Used for structures requiring a flat surface alignment, suitable for areas with low stress or for appearance requirements, but has a small clamping area and should avoid high load usage
- Large Flange Head (Large Flange): Suitable for soft materials such as plastics and composite boards, with good distribution of load, preventing surface indentation and cracking
The choice of hairstyle should be based on a balance between the hardness of the base material and functional requirements. It is not recommended to make a decision solely based on cost.
e. Material Matching and Corrosion Prevention Design
Electrochemical corrosion risk
When the material of the rivets has a significant potential difference from the base material (for example, aluminum plate paired with stainless steel rivets), it is prone to form galvanic corrosion in humid or salt-spray environments. The design should consider the following matching strategies:
- Priority given to the same material (such as aluminum versus aluminum, stainless steel versus stainless steel)
- If avoidance is not possible, insulating washers or anti-corrosion coatings should be used instead.
Waterproof Sealing Design
For outdoor or enclosed structure applications, it is recommended to choose those that have:
- Rubber sealed tail design (sealed rivet)
- Or it can be used in combination with a sealing washer (neoprene washer)
This type of design can effectively prevent moisture from penetrating into the intermediate layer, thereby extending the service life.
Practical Workflow for Implementing Blind Riveting in Engineering Design
During the product structure design phase, the introduction of the “blind riveting solution” requires a systematic consideration of material stacking, mechanical structure, processing accuracy, and batch assembly efficiency. The entire process is recommended to be divided into two stages: the “design decision stage” and the “manufacturing implementation stage”. At each stage, a verification mechanism should be established at key nodes to ensure that each rivet from the drawing to the product is controllable and consistent.
Design Decision Phase
The primary task is to accurately assess the material thickness at all connection points, including nominal thickness, tolerance, surface treatment, and functional coating layers. For instance, electrophoretic coatings and sealants can add additional thickness. If not accounted for, this will result in insufficient gripping or abnormal tail deformation. When selecting rivets, the Grip Range should be strictly used for selection to ensure that the total stack thickness falls within the middle-upper part of the clamping range, and avoid using total length as a substitute for Grip specifications. Additionally, when positioning and arranging the rivets in CAD, the layout should be optimized based on the structural force direction (such as triangular grid layout can improve fatigue life), and the basic design specifications of margin ≥ 2D and center distance ≥ 3D should be maintained to avoid sheet tearing or deformation due to too dense arrangement or being close to the edge.
Manufacturing Phase
The key points lie in the quality control of hole processing and the setting of assembly process parameters. The hole diameter must meet the recommended fit tolerance (generally the rod diameter +0.003″ to +0.005″), and must maintain roundness and perpendicularity to prevent uneven loading or micro-motion after the pin is inserted. The production line should use automated or semi-automated riveting equipment, preset parameters for tension, stroke and time window, and lock and trace them through the industrial control system or MES platform. Key positions should implement the first-piece full inspection and process sampling inspection mechanism to ensure that the clamping force, tail deformation quality and surface indentation are within the control range.
Common Mistakes in Blind Riveting Design and How to Avoid Them
① Ignoring the tolerance of plate thickness leads to insufficient clamping force
Common Misconceptions:
During the design process, the selection of rivets was solely based on the nominal thickness of the plate, ignoring the actual thickness tolerance of the material and the coating thickness. This resulted in a smaller or excessive grip range of the rivets, affecting the clamping force and deformation control.
Consequences:
- Residual gap between plates → Causes loosening or structural “shaking”
- Insufficient tail deformation → Clamping failure or incomplete riveting
Avoidance Suggestions:
- When calculating the total thickness, the following factors should be taken into account: ±sheet thickness tolerance + coating thickness + film thickness
- Prefer to choose the specifications whose gripping range is located in the middle of the total thickness by ±15%
- For mass production, a thickness grading table should be used to assist in selection
②. Incorrectly Taking the Total Length of the Rivets as the Design Basis
Common Misconceptions:
Some designers mistakenly used the total length of the rivets to match the plate thickness, ignoring the structural differences between it and the grip range.
Consequence:
- The rear end did not deform correctly after installation.
- The gun cannot complete the disconnection action after being installed.
Avoidance Suggestions:
- Design strictly according to “Grip Range” rather than “Total Length”
- All drawings or BOM annotations should indicate the “Grip” parameter, not the total length
③. Excessive spacing between nails or insufficient margins
Common Misconceptions
Due to the need for stronger connections or space constraints, the spacing of the rivets was designed too small, even violating the minimum Pitch and edge distance rules. Consequences:
- Board cracks along the edge of the hole
- Local warping or deformation, reducing fatigue life
Avoidance Suggestions:
- Follow the experience rule: Pitch ≥ 3D, Edge Distance ≥ 2D
- When the material is relatively soft (such as aluminum, plastic), it is recommended to increase the margin to ≥ 2.5D
- Avoid using rivets close to weakened areas such as folded edges, slots, or punching holes
④. Incompatibility of materials causes galvanic corrosion
Common Misconceptions:
To achieve higher strength or lower costs, unassessed combinations of dissimilar metals such as stainless steel nails with aluminum plates or copper nails with galvanized parts were adopted.
Consequences:
- Forming an electrochemical corrosion circuit in a humid environment
- The corrosion spreads from around the rivet hole and eventually leads to failure
Avoidance Suggestions:
- Use the same or similar metal materials (such as aluminum paired with aluminum, stainless steel paired with stainless steel)
- If unavoidable, add anti-corrosion measures (epoxy coating, sealing the tail end, nitrile rubber gasket)
- For important structures, conduct accelerated corrosion tests using ASTM G44/G85
⑤. Ignore the effects of thermal expansion and contraction or dynamic loading conditions
Common Misconceptions
Structures that are exposed to alternating temperatures, high-frequency vibrations or near heat sources do not have stress release designs for the rivets, and are still designed according to the normal temperature static load scheme.
Consequences:
- The material expands thermally, resulting in internal stress.
- The rivets develop fatigue cracks or undergo creep loosening.
Avoidance Suggestions:
- In areas with significant thermal deformation, use a floating hole design or elastic gaskets
- In high-frequency vibration environments, adopt a tail-locking structure (such as Huck Bolt) or enhance the clamping force
Validation and Quality Control in Blind Riveting Design
In terms of design verification, it is recommended to prioritize the introduction of finite element analysis (FEA) to conduct stress simulations at key riveting points, identifying stress concentration areas, fatigue hotspots, and potential failure risks. This is especially necessary in cases of variable loads, thermal-cold cycling, or eccentric loading. For the structural prototype stage, standard tensile/shear tests should be conducted to verify whether the rivets’ load-bearing capacity meets the design requirements, and at the same time, perform fatigue cycle tests (such as according to the ASTM E466 standard) to assess the durability of the structure over a long period of use. If there are multi-material or mixed connection structures, comprehensive tests such as vibration tables and climate chambers can also be introduced to simulate multiple factors of environmental conditions.
In terms of the quality control system, it is recommended to establish standardized SOP (Standard Operating Procedures) covering all stages from incoming material inspection, hole processing, rivet assembly to final inspection; in conjunction with special installation clamps and fixtures, ensure the consistency of workers’ clamping force and reduce human errors. At the same time, a tolerance caliper inspection standard needs to be formulated, regularly measuring key dimensions such as hole diameter, edge distance, and tail deformation, and introducing a regular quality inspection mechanism (e.g., every 500 pieces / every shift), recording the measurement data in the quality traceability system to achieve full-process closed-loop control.
Reference


How to Rivet Metal to Wood?
How to Rivet Metal to Woo

What Is Riveting in Metal Work?
What Is Riveting in Metal

What Metal Are Rivets Made Of
What Metal Are Rivets Mad
How to Rivet Metal to Metal
How to Rivet Metal to Met

