How to Pop Rivet in Tight Spaces
Table of Contents
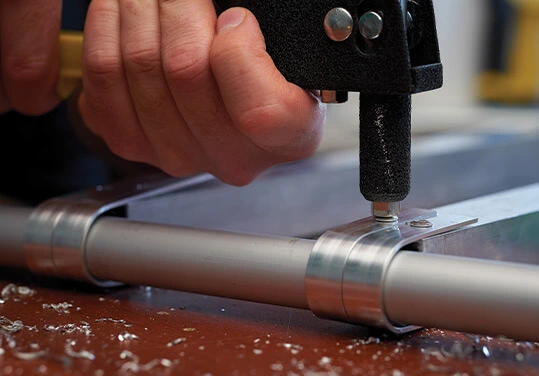
Riveting is an indispensable process in metalworking, auto repair, aircraft assembly, and even DIY projects. However, when space is limited, many people encounter the same problem: how to pop rivet in tight spaces. Operating in narrow positions, rivet guns often cannot reach inside. Hand movements are restricted, and even aligning the rivet holes becomes difficult. The result is that the rivets are not pulled tight, the workpieces become loose, and in severe cases, the materials may even be damaged.
Whether it’s the inner side of a car door, the outer shell of a chassis, or the narrow structural areas of an aircraft cabin, riveters may often feel at a loss. The root cause of the problem usually lies in the oversized tools, insufficient torque due to limited space, and obstructed operation vision. This article will provide professional techniques, tool selection, and operation suggestions based on practical cases. It will also share Rivmate’s industry solutions to help you complete riveting efficiently in any confined space.
What is Pop Riveting in Tight Spaces?
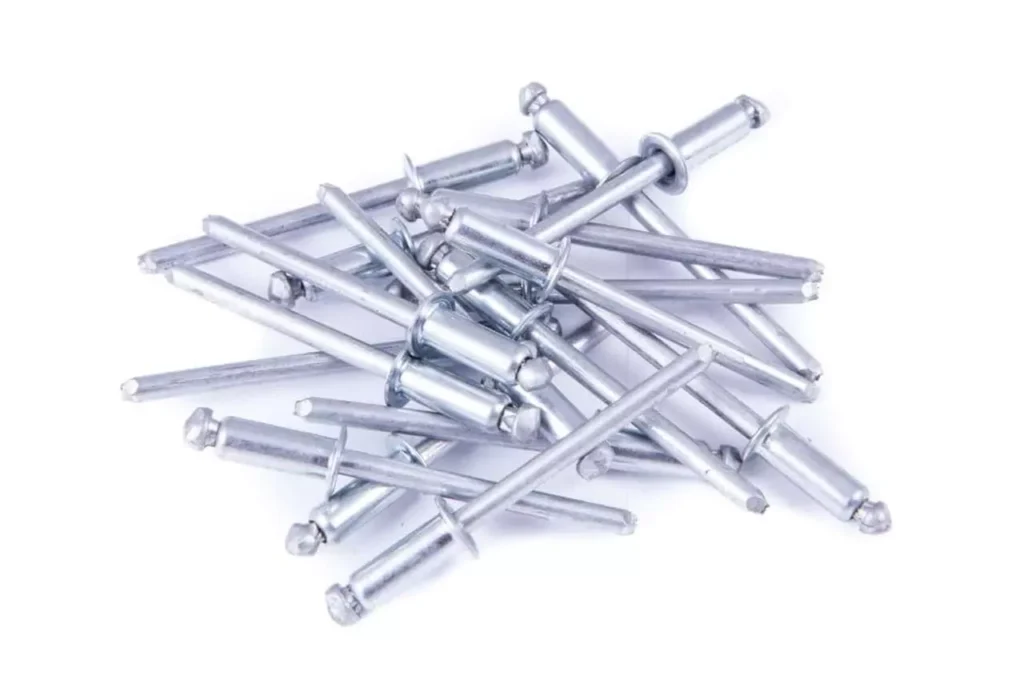
To understand how to perform riveting in a confined space, one must first review the basic principle of a pop rivet. A pop rivet consists of a rivet body and a mandrel. During the operation, the rivet gun pulls the mandrel, causing the tail of the rivet body to expand and lock onto the workpiece. Finally, the mandrel breaks at the designated position, leaving a secure connection. This method is also known as the mandrel break principle.
When riveting occurs in tight spaces, the difficulty becomes apparent. The limited space means insufficient operating angles, and the rivet gun may simply not be able to fit in. Even if it manages to enter, the oversized gun body will hinder the application of force, preventing the core shaft from breaking smoothly. Additionally, the narrow position is often accompanied by obstructed vision, making it difficult for the operator to accurately align the hole position, thereby increasing the risk of installation failure.
This situation is very common in practical applications:
- Automobile body repair: For instance, the internal reinforcement plates of the car doors or the corners of the chassis, where tools cannot easily reach.
- Appliance repair: The internal space of metal enclosures or electrical shells is limited, and the angle for riveting is restricted.
- Aerospace and ship structures: The frame spaces of aircraft cabins or compartments are narrow, and higher requirements are placed on the portability of tools.
- DIY projects: In furniture, metal frames, or small equipment, there are often enclosed or semi-enclosed spaces that require riveting.
In these scenarios, the key to solving the problems lies in choosing the appropriate tools and techniques.
Why Is Riveting in Tight Spaces Difficult?
In open spaces, performing pop rivet operations with a rivet gun is usually not complicated. However, once entering a narrow environment, the difficulty will increase exponentially. The main reasons are as follows:
1. Conflict between Tools and Space
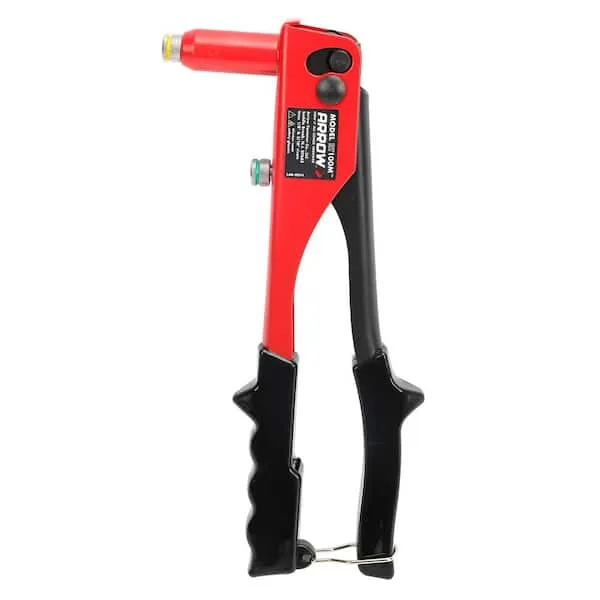
Traditional manual riveting guns are large in size and require sufficient operating space to apply force. In restricted areas, the gun body often cannot fully extend in, causing the riveting process to be obstructed. Data shows that approximately more than 40% of automotive body repair orders involve issues related to insufficient space.
2. Insufficient Torque Transmission
In a confined space, the operating angle is limited, and insufficient force cannot be applied to pull the core shaft. This will result in insufficient expansion of the rivet body, reduced connection strength of the rivets, and even a semi-tightened state. For high-strength applications such as aviation or ships, this situation is unacceptable.
3. Restricted Field of Vision
In narrow spaces, operators often cannot see the positions of the rivet holes and have to operate by feel. This significantly increases the probability of alignment failure. If the rivets do not enter the holes vertically, the final connection will be misaligned or loose.

In confined spaces, riveters are more likely to overlook the matching of the rivet size and the grip range. If they choose rivets that are too long or too thick, it will further increase the installation difficulty and may even prevent the operation from being completed.
How to Pop Rivet in Tight Spaces?
(1) Tool Selection
Compact rivet guns / right-angle rivet tools
When operating in a confined space, compact or right-angle nail guns are often the preferred choice. These tools have a smaller outer diameter of the nose cone and a shorter body, which enables them to fit into restricted passages. It is generally recommended that the outer diameter of the nose cone be 1 to 2 millimeters smaller than the minimum width of the passage to ensure smooth insertion. For 90-degree restricted positions, such as the interior of a car door or the corner of a chassis, right-angle head tools can effectively achieve alignment.
In addition, it is important to ensure that the stroke is sufficient to cover the recommended stretching stroke for the rivets. Insufficient stroke can lead to “half-tightening”, which will affect the connection strength. To enhance flexibility, it is advisable to prepare multiple specifications of nosepieces, so that you can quickly switch between common specifications such as 2.4, 3.2, 4.0, and 4.8 millimeters.
Cordless rivet guns with slim heads
In some operation scenarios, cordless narrow-head riveting guns perform even better. These tools eliminate the need for air hose dragging and have greater maneuverability, making them ideal for limited spaces such as aircraft cabins and vehicle chassis. The narrow-head design combined with the side-mounted battery significantly reduces interference with surrounding structures.

When selecting the tool, it is necessary to ensure that the tension level of the tool matches the diameter and material of the target rivet. There is no need to pursue excessively high tension; the best approach is to aim for “just enough”. Additionally, it is preferable to choose models with a core box and a chip removal channel, which can enhance operational safety by preventing the core shaft from falling into the cavity, and also improve the production cycle.
Hydraulic / pneumatic with extensions

When operating in batches or at repetitive points, hydraulic or pneumatic riveting guns combined with extension pieces are often the best solution. These tools are highly efficient and can significantly reduce the fatigue of workers, making them suitable for long-term operations. By using extension rods or ultra-thin extension nose cones, it is easy to enter deep cavities for riveting.
However, during use, attention should be paid to the counterforce, especially on soft materials. Excessive force may cause the workpiece to deform. In such cases, it is recommended to install a back-up washer to distribute the stress and protect the workpiece.
Rivmate Practical Advice
- Equip a compact right-angle riveting gun as a “special machine” for narrow points.
- Always have an “extension nose cone set” and “elongated nose tip” ready. Cover your main specifications.
- Uniform maintenance cycle. Check the jaws, clamping force, and lubrication by shift. Narrow points are most afraid of “failure at the last moment”.
(2) Rivet Selection
Short Body Rivets
- The body is short, requiring a smaller stretching stroke. Less space is needed.
- Suitable for thin plates and short clamping (short grip) structures.
Blind Rivets
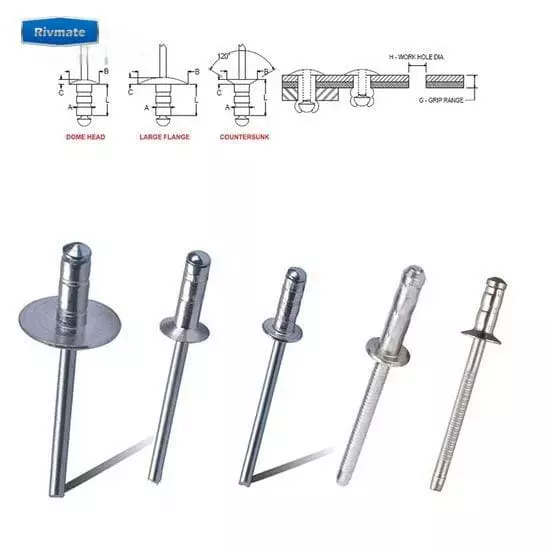
Single-sided accessibility is sufficient for installation. It is the preferred choice for tight spaces.
The selection depends on the “grip range“. The total material thickness (TMT) must fall within the grip range of the rivets.
Calculation: TMT = Plate thickness 1 + Plate thickness 2 + Core/coating thickness + Allowable gap.
For soft or thin materials, choose the large flange to distribute stress and reduce “pull-through”.
When sealing is required, use closed-end rivets. They are resistant to leakage and dust.
- Compatible with different thicknesses. Reduces incorrect material preparation and rework.
- Suitable for repair and modification scenarios. The diameter variation is also more accommodating.
Hole Size and Material Matching
- Recommended hole size: Bolt body diameter + 0.1 to 0.2 mm (metric); or +0.003 to 0.007 in (imperial).
- For contact between dissimilar metals, anti-corrosion treatment is required. For example, aluminum to steel or aluminum to copper, a gasket or coating should be used for isolation.
- When the backside is inaccessible and the material is soft, consider peel type (peel) or petal type blind rivets to enhance backside support.
(3) Techniques and Operating Methods
Visualization of Contrast
Use a small mirror, an endoscope or a miniature camera on a mobile phone. First, confirm the hole position, the fitting surface and the burrs.
In extremely narrow positions, first use a guiding punch or a conical guiding pin to lightly position the part, and then attach the rivets.
Lightly lubricated mandrel
Stop at the nose and mouth area. Reduce friction and minimize core jamming. Prohibit contamination of the body and the inner wall of the hole. Otherwise, it will affect frictional anchoring and anti-loosening.
"Slanting into the gun" vs "Extending the pull lever"
A slight tilt can facilitate entry, but it must be corrected immediately upon reaching the desired shape. The target is: axis deviation ≤ 5°.
When accessibility is poor and vertical alignment is required, it is preferable to use the elongated nose cone/ right-angle head rather than a long-term slanted design.
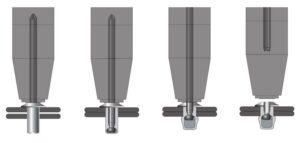
Apply force gradually to avoid violent pulling
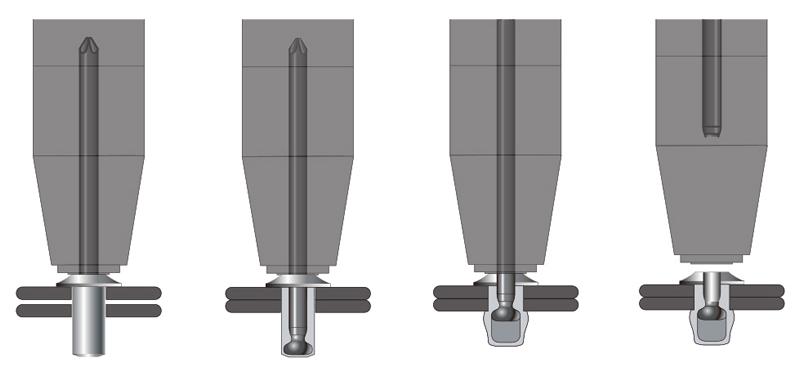
Adopt a rhythm of “touch – pre-pull – reset – final pull”, repeating it two to three times.
Objective: To allow the rivet body to gradually expand, ensuring a more thorough fit of the seat surface. This will reduce “partial breakage” and “eccentric cracking”.
Hole treatment and edge protection
First remove the burrs, then remove the debris. For narrow areas, use a tap handle with a short manual handle. For coated parts, apply a thin coating or conduct spot gluing on the edge of the hole, which serves as the starting point for corrosion prevention.
Back support
Soft materials or large aperture diameters, combined with a “backside gasket” configuration, yield remarkable results. When the backside is inaccessible, choose a “large flange” or “tear-off type” solution to equivalently increase the supporting surface.
(4) Auxiliary Tools / Accessories
- Nosepiece Extensions (Extended Head): Enhance accessibility. Ensure compatibility with the body’s pulling force and stroke.
- Right-angle Adapters (Straight Angle Adaptors): Transform traditional guns into straight angles. Suitable for occasional positions.
- Professional Fixtures / Cleco Temporary Fasteners: Position first and then rivet. The consistency of hole positions and the degree of fit have significantly improved.
- Magnetic Core Cups, Core Shredder Collectors: Prevent core shafts from falling into the cavity and causing abnormal sounds or requiring rework.
- Thin-walled Limiting Pads: Control the depth of the head’s descent to prevent soft materials from collapsing.
(5) Step-by-Step Guide
5.1. Assessing space and thickness
Before starting the riveting process, it is necessary to conduct an assessment of the space. Measure the minimum width of the passage and the reachable length to the hole position to ensure that the tools can fit in. At the same time, calculate the total material thickness (TMT) and confirm whether the required grip range covers it. If the grip range is not suitable, even if the tools can fit in, there is no guarantee of a secure riveting effect.
5.2. Preparation of Holes and Materials
The size of the hole determines whether the rivet can be formed correctly. Generally, it is recommended that the hole diameter be the diameter of the rivet body plus 0.1 to 0.2 millimeters to ensure that it can be inserted smoothly while also having sufficient interference. After drilling, remove the burrs and chips to keep the hole opening clean. The surface should be kept dry. If necessary, perform anti-corrosion pre-treatment before riveting to avoid corrosion problems in the future.
5.3. Selecting rivets and Tools
According to the specific situation, choose blind rivets, short-body rivets or multi-clamping range rivets to adapt to different thicknesses and space limitations.
In terms of tools, it is recommended to use compact, right-angle or narrow-head nail guns. If the space is extremely limited, an extension nozzle can be used in conjunction. Before conducting formal batch operations, a single nail should be installed as a “first article confirmation” to check the fit of the workpiece and visibility, and to ensure that the plan is feasible.
5.4. Positioning and Clamping
In a confined space, the workpiece is prone to minor misalignment. Therefore, it is necessary to fix the workpiece before performing the riveting. Cleco or fixtures can be used to secure both ends of the workpiece, and then handle the middle points one by one.
For areas with restricted visibility, use mirrors or endoscopes to check whether the rivet heads are fully in contact with the surface of the workpiece, avoiding any misalignment or floating rivet heads.
5.5. Riveting Operation
During the operation, the rivets should be inserted vertically into the holes, ensuring that the nose and the rivet cap are perfectly aligned. When performing the riveting, it is recommended to follow a step-by-step rhythm of “pre-tension – reset – final tension”, rather than applying excessive force all at once.
In the final final pull stage, make sure that the rivet is perpendicular to the hole position. Keep the tool in place for 1 second after the mandrel breaks to ensure that the rivet is fully formed, and then release the rivet gun.
5.6. Forming Inspection
After the riveting is completed, a rapid quality inspection is required. Ideally, the rivet head should be tightly attached to the surface of the workpiece without any indentation. The back formation should be full and without eccentricity. The cross-section of the core shaft should be neat, not protruding outward, and not loose. If necessary, the stability of the connection can be confirmed by manual pulling or marking methods.
5.7. Conclusion and Error Prevention
The final step is cleaning and recording. After the operation is completed, residual mandrels and chips should be promptly removed to avoid leaving any hazards in the cavity. In batch operations, the torque or tension curves should also be recorded, and abnormal situations regarding the number of broken cores should be monitored.
For concealed locations, it is recommended to attach labels and record the accessible paths and tool combinations, which will facilitate subsequent maintenance and re-inspection.
Common Mistakes and How to Avoid Them
When performing riveting in a confined space, the probability of problems occurring is higher. If not controlled properly, it can easily lead to rework or even scrapping. Here are some common mistakes and their solutions:
①. The tool can't get in → Use the right-angle rivet gun
Traditional linear riveting guns are often too large and difficult to fit into tight spaces. The solution is to choose a right-angle rivet gun or a compact tool with an extended head. This significantly improves accessibility.
②. The rivet is not fully tightened → Check the rivet's grip range
If the tail of the rivet does not fully expand, it is usually because the grip range was selected incorrectly. It is necessary to ensure that the rivet’s grip range covers the total thickness of the material (TMT). Research shows that over 20% of riveting loosening cases are caused by incorrect selection of the grip range.
③. The core shaft gets stuck → Use lubricating oil or replace the extension lever
The mandrel may get stuck during the riveting process, and the main reasons are excessive friction or wear of the tool jaws. The mandrel can be lightly lubricated or a new gripper/extension pull rod can be replaced to ensure that the mandrel can break smoothly.
④. Selecting a too-long rivet → Results in the rivet deforming
Longer rivets require more space to complete the stretching process. In tight spaces, these types of rivets often deform or get pulled out of alignment. The solution is to calculate the material thickness in advance and choose short body rivets or multi-grip rivets to reduce the risk.
Pro Tips from Rivmate

In tight space riveting, not only do you need the right tools, but also you need to master some specific techniques. These methods may seem simple, but they can significantly improve the success rate and connection quality.
a. When pre-drilling, the diameter is 0.1–0.2mm smaller than the rivet
If the aperture is too large, it may cause the rivets to loosen. Maintaining a tolerance of 0.1–0.2mm smaller than the diameter of the rivet body can ensure that the rivet firmly locks in place during stretching. Standard data shows that this can increase the shear strength by approximately 15–20%.
b. Always ensure that the rivet head is firmly in contact with the workpiece
The rivet cap must be perfectly flush with the surface of the workpiece. If there is any gap, the final product is prone to looseness or noise. When operating in a narrow space, a mirror or probe can be used to confirm the degree of fit.
c. Regular maintenance of riveting guns
The problem with the core pins is usually not the rivets themselves, but rather the wear of the tool clamping jaws or the lack of lubrication. It is recommended to inspect the clamping jaws every 500-1000 operations and to regularly add lubricating oil to ensure stable pulling force.
4. When performing batch operations, prefer to use pneumatic or electric tools
In large-scale riveting operations, manual tools are prone to causing fatigue, especially in confined spaces. Using pneumatic or electric tools not only enhances efficiency but also reduces rework due to unstable operation. Data shows that electric tools can shorten the operation time by more than 30%.
FAQ
Theoretically it is possible, but the efficiency and reliability are very low. Some people will try to manually deform the rivets using a hammer and a punch, but this method is difficult to ensure the tensile force and consistency. For connections that require firmness and long-term use, special rivet guns must be used. Even in narrow spaces, there are compact or right-angle tools available.
Q2: What’s the best rivet gun for tight spaces?
The best choice depends on the application scenario. If the space is extremely limited, the right-angle rivet gun is usually the most effective. If flexibility is needed, a compact cordless rivet gun can be chosen. For batch operations, it is recommended to use pneumatic or hydraulic tools along with an extension nose cone. The key is to ensure that the tool stroke matches the specifications of the rivets.
The removal method is usually the core drilling method: Use a small drill bit to drill through the center of the rivet until the rivet cap separates from the workpiece. In narrow spaces, a right-angle electric drill or short-handled drill tool can be selected. Be sure to control the size of the drill bit to avoid damaging the diameter of the workpiece hole. If frequent disassembly is required, it is recommended to use threaded rivet nuts instead.
Q4: Are there alternatives to pop rivets in confined areas?
There are several alternative options:
- Rivet Nuts: Suitable for structures that require subsequent maintenance and can be installed on one side.
- Self-Tapping Screws: Easy to install, but have poor vibration resistance.
- Adhesives or Structural Glues: Suitable for some non-load-bearing connections, but have a long curing time.
In structures with high requirements for load-bearing or safety, blind rivets remain the preferred choice.
Conclusion: Mastering Riveting in Tight Spaces
Yes, it’s possible to rivet in tight spaces if you choose the right tools, rivets, and techniques. The challenges of joining in narrow spaces mainly stem from limited tools, insufficient torque, and inconvenient operation. However, by appropriately choosing right-angle nail guns, short-body nails, and blind nails, and mastering techniques such as stepwise force application and visual positioning, it is entirely possible to complete high-quality joining in restricted environments. Whether it’s in automotive repair, aerospace manufacturing, or everyday DIY, professional methods can reduce rework and enhance the reliability of the connections.
Explore More with Rivmate
If you are looking for compact riveting tools, blind rivets or multi-clamping range rivets specifically designed for narrow spaces, Rivmate can offer you a complete solution. Our tools have been verified in the industry and are suitable for various application scenarios. To obtain more practical tips, product information and case studies, please visit Rivmate’s technical resource library or contact our expert team.
Reference


How to Rivet Metal to Wood?
How to Rivet Metal to Woo

What Is Riveting in Metal Work?
What Is Riveting in Metal

What Metal Are Rivets Made Of
What Metal Are Rivets Mad
How to Rivet Metal to Metal
How to Rivet Metal to Met

