To properly tighten a rivet nut, the most important step is to select the right installation tool. This ensures that the rivet nut expands fully and evenly on the back of the sheet metal, thereby securing it firmly in the pre-drilled hole.
There are many factors that affect the proper tightening of a rivet nut, including the grip range, installation hole diameter, thread specifications, installation tools, and installation method. You need to select the appropriate rivet nut specifications and tools to ensure proper tightening.
Table of Contents
Identify Whether the Insert or the Bolt Is Loose
The problem of loose rivet nuts primarily occurs at two locations: between the rivet nut and the sheet metal, or between the bolt and the threads of the rivet nut. The visual symptoms of these two issues are similar; however, their specific causes and solutions are entirely different. If the two issues are misidentified, the problem will not be effectively resolved after repair.
Check to see if the rivet nut rotates inside the mounting hole
The problem of loose rivet nuts is primarily characterized by the entire rivet nut rotating within the mounting hole in the sheet metal. When you tighten or remove the bolt, the rivet nut rotates along with the bolt. This phenomenon indicates that the anti-rotation capacity between the rivet nut and the sheet metal is insufficient, and it cannot effectively resist the rotational torque transmitted by the bolt.
Methods for identifying a loose rivet nut. First, observe the positional relationship between the rivet nut flange and the sheet metal. Make an alignment mark on both the rivet nut flange and the surface of the sheet metal. Then, use a suitable hand tool to slowly turn the bolt. If the two marks shift relative to each other, this indicates that the rivet nut itself is rotating within the mounting hole, rather than the bolt being loose.
The main causes of rivet nut loosening are:
- Excessively large mounting holes
- Inappropriate selection of the nut clamping range
- Insufficient deformation during riveting
- Mismatch between the rivet nut design and the sheet metal
Check whether the bolt is loose inside the rivet nut
If the rivet nut remains fixed in place but the bolt can rotate relative to it, the problem lies in the bolt connection.
Here’s how to determine if a bolt is loose: First, make marks on both the bolt head and the flange of the rivet nut, then slowly turn the bolt. At the same time, observe whether the rivet nut remains in its original position. If the bolt can rotate relative to the rivet nut while the rivet nut remains fixed to the plate, this indicates that the problem lies not at the interface between the rivet nut and the plate, but on the side of the bolt connection.
Bolt loosening can be addressed by distinguishing between two scenarios. The first is when the bolt moves inward normally as it rotates and gradually generates clamping force. The problem is that the bolt was not properly tightened initially. The second scenario is when the bolt continues to spin freely without forming proper thread engagement or generating clamping force. The problem lies in damaged internal threads, mismatched thread specifications, or the bolt not engaging correctly.
Common causes of bolt loosening include:
- Gradual loosening of the bolt due to vibration
- Insufficient initial tightening of the bolt
- Thread damage
- Mismatched thread specifications between the bolt and the rivet nut
How to Distinguish Between Loose Rivet Nuts and Loose Bolts Using Alignment Marks
| Inspection Finding | Possible Issue | How to Identify |
|---|---|---|
| Bolt and rivet nut rotate together | Rivet nut spinning in the installation hole | Relative movement occurs between the rivet nut and the sheet material. |
| Bolt rotates while rivet nut remains fixed | Problem with the bolt connection | The bolt rotates relative to the rivet nut, while the insert remains fixed in the sheet. |
| Bolt gradually backs out while rivet nut remains stationary | Bolt loosening | The bolt moves outward and loses its original clamping condition, while the rivet nut stays in place. |
| Bolt spins continuously without tightening | Possible thread damage or incorrect thread engagement | The bolt cannot establish proper thread engagement or generate the required clamping force. |
Check Grip Range, Hole Condition, and Thread Damage First
If you notice that a rivet nut is loose, rotating, or failing to secure properly, do not immediately increase the pulling force of the rivet nut gun or repeatedly rivet it in an attempt to resolve the issue. Before reinstalling or adjusting it, you should check these three factors: Grip Range, Hole Condition, and Thread Damage. These factors determine whether the rivet nut can deform correctly, securely clamp the sheet metal, and ensure a reliable bolt connection.
1. Check whether the grip range matches the actual sheet thickness
Grip range refers to the range of material thicknesses that a rivet nut can reliably clamp. The rivet nut specification you select must be capable of accommodating the total actual material thickness at the installation location.
When there is bending, burrs, or localized gaps between multiple layers of sheet metal, the actual grip range will differ from the theoretical thickness. You must measure the actual thickness of all materials to be joined near the installation holes. Do not simply rely on the dimensions listed in the material specification table.
Correct procedure: Check the grip range specified in the supplier’s rivet nut product specifications and compare it with the actual total material thickness measured at the installation location. If the actual thickness falls outside the specified range, replace the rivet nut with one that has an appropriate grip range; the problem cannot be resolved simply by increasing the pulling force of the installation tool.
2. Check whether the mounting hole is too large, too small, or deformed
The size and shape of the mounting hole directly affect the mechanical riveting performance between the rivet nut and the sheet metal. If the mounting hole is too large, there will be significant clearance between the rivet nut body and the hole wall, making it prone to rotation after installation. If the mounting hole is too small, the rivet nut cannot be properly inserted; forcing it in may also damage the rivet nut body or the sheet metal.
The shape of the mounting hole, as well as burrs and tears along the edges, can also directly affect the quality of the installation. You must verify that the shape of the mounting hole and the material thickness around it meet the structural requirements of the rivet nut. Round rivet nuts require a round hole of the specified size. Half-hex or full-hex rivet nuts must match the corresponding hexagonal hole shape.
Correct verification method: Use professional measuring tools to check the diameter of the mounting hole and compare it with the manufacturer’s specified hole diameter requirements for the corresponding product. For hexagonal rivet nuts, you must also check the shape and dimensions of the hole. If the mounting hole is out of tolerance, select an appropriate repair solution based on the sheet metal thickness, connection requirements, and product specifications.
3. Check for Damage to the Internal Threads
If, after installation, the rivet nut is securely fastened to the sheet metal but the bolt cannot be screwed in properly, keeps spinning freely, or fails to generate an effective clamping force, you need to inspect the internal threads of the rivet nut.
If the threads are worn, deformed, stripped, or locally damaged, the bolt will not engage properly with the rivet nut. Even if the rivet nut itself is not loose, the entire bolted connection is at risk of failure.
Correct Diagnostic Procedure: First, inspect the interior of the rivet nut for any obvious thread deformation or damage. Next, perform a manual test fit using a bolt that exactly matches the rivet nut’s thread specifications. Under normal circumstances, the bolt should enter smoothly without noticeable jamming, cross-threading, or continuous slipping. If conditions permit, use a thread plug gauge to further inspect the dimensions and condition of the internal threads.
If professional methods confirm that the internal thread is damaged, the issue cannot be resolved by screwing in a bolt or repeatedly riveting the rivet nut. The correct procedure is to remove the damaged rivet nut. Then, check whether the mounting hole still meets the requirements before replacing it with a suitable new rivet nut. If the mounting hole has been enlarged during removal, the rivet nut specifications must also be reevaluated.
Choose a Rivet Nut Setter or a Controlled Bolt-and-Nut Method
Once you have confirmed that the clamping range, mounting holes, and internal threads of the rivet nut are all in order, you need to select the appropriate installation method. There are two common installation methods: using a specialized rivet nut setter, or a manual installation method involving a bolt and nut (the bolt-and-nut method). Both methods work by applying axial tension to cause plastic deformation at the tail end of the rivet nut. The differences lie in installation accuracy, ease of operation, and repeatability.
Use a specialized rivet nut setter
The most recommended installation method is to use a dedicated rivet nut tool. The main advantage is that it allows for better control over the installation process. Depending on the type of tool, you can control the degree of deformation of the rivet nut by adjusting parameters such as the riveting stroke or pulling force. Compared to manual installation, a properly configured dedicated tool makes it easier to achieve consistent, repeatable installation results.
When selecting a specialized installation tool, focus on these three factors: First, the tool’s mandrel must match the thread size and pitch of the rivet nut. Second, the tool must have sufficient installation capacity to meet the riveting pressure requirements of the corresponding rivet nut. Third, the tool’s stroke or force adjustment range must match the rivet nut’s structure, dimensions, and material thickness.
The video below shows our staff demonstrating the operating procedure for a pneumatic rivet nut gun, illustrating the standardized installation process for rivet nuts. Please pay close attention to how the tool engages with the rivet nut, the progression of the riveting action, and the final assembly—specifically, how the rivet nut flange fits flush against the sheet metal and how the internal threads remain intact. By observing these details, you can master the proper use of this tool and quickly determine whether the rivet nut assembly meets quality standards.
Common specialized rivet nut installation tools:
- Manual rivet nut guns are suitable for small-scale installations and repair work.
- Electric or battery-powered tools are suitable for jobs requiring both mobility and installation efficiency.
- Pneumatic rivet nut guns are better suited for mass production environments with a stable compressed air supply.
Installation Using the Bolt-and-Nut Method
Select bolts, nuts, and washers to assemble a simple manual installation device. This method uses the bolt to provide axial tension, while the nut and washers generate a reaction force that causes the tail end of the rivet nut to deform.
Procedure:
- Screw the bolt into the rivet nut, then install a washer and an external nut on the outside of the bolt.
- During installation, use one wrench to hold the bolt head in place while using another wrench to slowly tighten the external nut.
- The washer presses against the rivet nut’s flange, and the bolt pulls on the rivet nut, causing its tail to expand and completing the riveting process.
Set the Mandrel Engagement and Tool Stroke Correctly

The mandrel engagement depth and tool stroke determine whether the tail end of the rivet nut can be sufficiently deformed and whether the internal threads are protected during installation. Therefore, you should pay close attention to the settings of these two parameters during installation. Adjust them according to the rivet nut specifications and the actual sheet metal thickness.
How do you properly set the mandrel engagement depth?
- Step 1: Verify the thread specifications of the mandrel and the rivet nut.
First, check that the mandrel and the rivet nut have the same nominal diameter, pitch, and thread direction. - Step 2: Install the matching mandrel and nose piece.
After replacing the mandrel, verify that the nose piece matches the specifications of the rivet nut. For some tools, you must first disconnect the air supply or remove the battery, then loosen the locking nut, replace the mandrel and nose piece, and finally retighten the locking nut. - Step 3: Adjust the working length of the mandrel.
Adjust the position of the mandrel relative to the nose piece based on the actual length of the rivet nut. Ensure that the rivet nut can fully utilize the effective thread engagement length provided by the design. When installing a closed-end rivet nut, pay special attention to checking its internal effective thread depth. Avoid insufficient engagement caused by a mandrel that is too short, and do not allow the mandrel to extend beyond the effective thread area and abut against the closed end. - Step 4: Check the engagement.
Screw the rivet nut onto the mandrel to confirm that the threads engage smoothly. At the same time, ensure that the rivet nut fits correctly against the nose’s load-bearing surface, with no obvious skewing, misalignment, or abnormal gaps. If the rivet nut becomes stuck during insertion, do not force it; check the mandrel specifications and the condition of the threads first.
How do you properly adjust the installation stroke of a rivet nut?
Step 1: Determine which control method to use based on the selected installation tool.
- Stroke Control: Controls the degree of deformation of the rivet nut by setting the pulling distance of the mandrel. This method is more suitable for installing rivet nuts of the same length on sheet metal of a fixed thickness.
- Setting Force Control: Controls the rivet nut installation process by setting the pulling force applied by the tool. This method is more suitable for installing rivet nuts of varying lengths or on sheet metal with varying thicknesses.
Step 2: Set the initial stroke based on the rivet nut specifications and material thickness.
You must first determine the rivet nut’s thread specifications, body length, clamping range, and actual material thickness. Only then can you consult the technical data provided by the manufacturers of the rivet nuts and installation tools.
Step 3: Determine the appropriate stroke by performing a test installation on an actual sheet using a sample.
Prepare a test panel made of the same material, with the same thickness, and under the same mounting hole conditions as the actual workpiece. First, install the rivet nut using the initial value recommended by the manufacturer. After installation, inspect the deformation on both the front and back sides.
If insufficient tail deformation is observed, gradually increase the stroke according to the tool manual. If over-compression, internal thread deformation, or sheet damage occurs, reduce the stroke appropriately.
Step 4: Inspect the installed condition and results.
Whether you increase or decrease the stroke, you must use a new rivet nut for retesting. Do not reuse rivet nuts that have already been riveted to verify parameters, as this may lead to inaccurate results.
Tighten an Under-Set Insert Without Over-Crushing It
To retighten an under-riveted rivet nut, you must first determine the cause of the under-riveting. If the actual cause is an oversized mounting hole, an incompatible clamping range, an incorrect rivet nut design, or damage to the internal threads, continuing to pull the rivet may actually cause more severe damage.
The correct procedure is as follows: First, confirm that the rivet nut is indeed under-riveted. Then, determine whether supplementary riveting can be performed at the original location. If the rivet nut itself or the mounting hole has already been damaged, rivet nut must be removed and a new model selected. Only if the deformation is limited to the tail end—and the mounting hole, clamping range, and rivet nut are intact—should supplementary riveting be considered. Depending on the tool type, increase the riveting stroke or installation force. It is important to proceed with small, incremental adjustments.
How Can You Avoid Over-Tightening Rivet Nuts?
During installation, excessive riveting stroke or force can cause the rivet nut to fail. Therefore, after each additional riveting stroke, you should inspect the condition of both the front and back sides of the rivet nut. If the closed head has formed completely, the flange is properly seated, and the internal threads are undamaged, stop applying additional force.
Deal with a Spinning Insert and Know When to Replace It
| Fault Condition | Recommended Action | Precautions |
|---|---|---|
| Insert under-set during initial installation, with the hole in good condition | Re-set the insert using a tool that supports secondary setting, if permitted by the manufacturer. | Gradually increase the stroke or setting force to avoid over-deformation. |
| Oversized installation hole | Remove the original rivet nut and assess whether the hole needs to be enlarged to accommodate a suitably sized replacement. | The replacement must meet the sheet thickness and edge-distance requirements. |
| Oval-shaped hole or deformed hole edges | Remove the rivet nut, repair the hole, or select a new installation location. | Do not reinstall the same size rivet nut in a deformed hole. |
| Cracked or severely deformed rivet nut body | Remove and replace the damaged rivet nut. | Do not continue using a damaged insert. |
| Stripped or damaged internal threads | Replace the rivet nut and check the bolt thread specification. | Do not attempt to restore damaged threads by increasing tightening torque. |
| Insert continues to spin after multiple installation attempts | Reassess the rivet nut design, installation hole condition, and grip range. | Do not repeatedly increase the setting force. |
When should rivet nuts be removed and replaced?
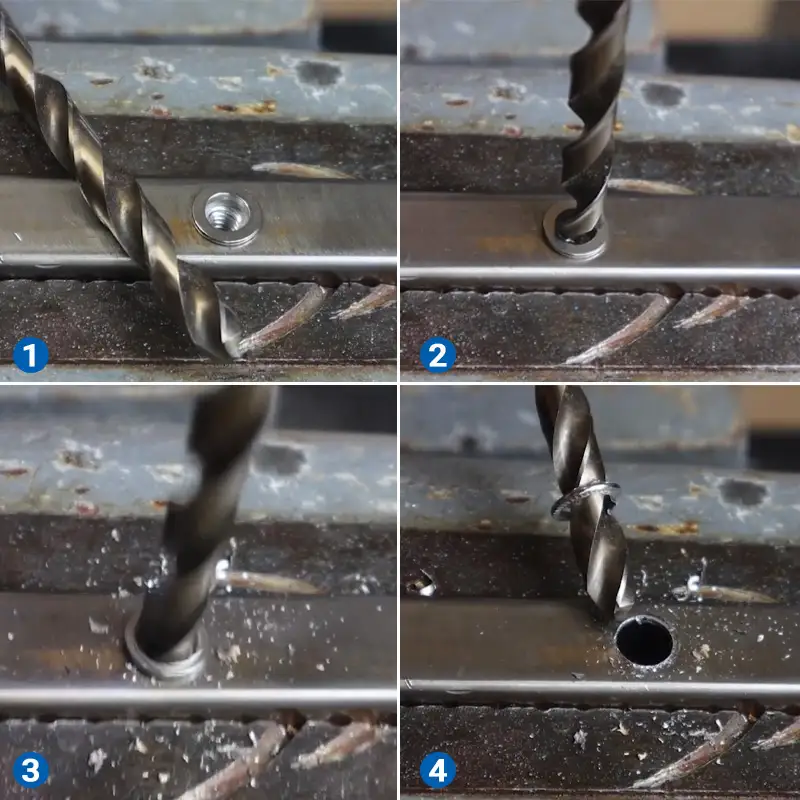
- The mounting holes in the sheet metal have been enlarged: The diameter of the mounting holes exceeds the range specified by the manufacturer of the new rivet nuts.
- The mounting holes are deformed: The mounting holes are oval-shaped, have torn edges, or show obvious mechanical damage.
- The internal threads of the rivet nut are damaged: The bolt cannot engage properly, resulting in stripped threads, misalignment, or continuous slippage.
- The rivet nut itself is damaged or deformed: The body is cracked, the flange is damaged, or the tail end is abnormally deformed.
- The rivet nut continues to rotate even after multiple installation attempts: The product selection or installation conditions are incompatible.
Tighten the Assembly Bolt to the Specified Torque
Tightening torque refers to the rotational force applied when turning a bolt with a wrench. It is measured in N·m. Tightening torque determines the axial clamping force generated when the bolt presses the connected components together.
Tightening a bolt does not necessarily result in a stronger connection. You need to determine the tightening torque based on the bolt specifications, the load-bearing capacity of the rivet nut, the materials being joined, and the actual operating conditions. Focus on the factors listed below the table when making this determination:
| Influencing Factor | Why It Matters | Selection and Inspection Recommendations |
|---|---|---|
| Bolt Size and Strength Grade | Determines the preload the bolt can withstand. | Confirm the thread diameter, pitch, and strength grade. |
| Internal Threads of the Rivet Nut | Determine the load capacity of the threaded connection. | Check the thread load capacity and effective thread engagement length. |
| Sheet Thickness and Material | Affect the rivet nut’s holding capacity and the load-bearing capacity of the joint. | Verify compatibility with the actual base material and grip conditions. |
| Surface Finish and Lubrication Condition | Affect friction at the threads and bearing surfaces. | Follow the dry or lubricated conditions specified in the torque requirements. |
| Joint Configuration | Affects the actual clamping condition and load distribution. | Check the design of washers, connecting plates, and contact surfaces. |
Inspect Seating, Rotation, and Thread Function After Setting
| Inspection Item | How to Check | Acceptable Condition | Signs of Problems |
|---|---|---|---|
| Flange Seating | Visually inspect the flange-to-sheet contact and check the rear closing head when accessible. | The flange is properly seated, without abnormal gaps or tilting. Rear deformation meets the product design requirements. | Raised or tilted flange, abnormal gaps, insufficient deformation, or visible damage. |
| Rotation Resistance | Use a correctly matched bolt and observe whether the rivet nut moves relative to the sheet. Perform a spin-out torque test when required. | The rivet nut remains securely fixed in the installation hole under the specified inspection conditions. | The insert spins, shifts, or loses its anti-rotation capability. |
| Thread Function | Manually install a matching bolt. Use a thread plug gauge when dimensional inspection is required. | The bolt engages smoothly without cross-threading, binding, or stripped threads. Thread engagement meets design requirements. | Thread damage, incorrect engagement, binding, cross-threading, or continuous spinning. |
| Bolt Engagement | Check the effective thread engagement length and bolt length, especially with closed-end rivet nuts. | The bolt has sufficient thread engagement and does not bottom out before clamping the joint. | Insufficient thread engagement or the bolt contacting the closed end before the joint is clamped. |
FAQs
Can threadlocker fix a loose rivet nut body?
Threadlocker cannot fix a loose rivet nut itself. The primary function of threadlocker is to prevent the threads between a bolt and a rivet nut from coming loose, thereby preventing the bolt from loosening due to vibration. It cannot fix looseness between the rivet nut itself and the sheet metal.
Can I use an impact driver to set a rivet nut?
We do not recommend using a standard impact driver to install rivet nuts. Impact drivers operate by delivering continuous rotational impact torque. The installation of rivet nuts, however, requires applying controlled axial tension to the rivet body or following a specified rotation pattern to complete the riveting process. The mismatch between these two operating modes may lead to failure due to over-installation.
Can rivet nuts be tightened from one side?
Rivet nuts can be tightened from one side only. This is one of the greatest advantages of rivet nuts. There is no need to access the back of the sheet metal.
Should the tool mandrel be lubricated?
The tie rod on the rivet nut installation tool requires lubrication. You should select the lubricant, lubrication points, and maintenance schedule according to the supplier’s instructions.
Can a closed-end insert be tightened with a long bolt?
Closed-end rivet nuts can be tightened using longer bolts. However, the bolt length must not exceed the effective internal depth of the closed-end rivet nut, because the bottom of a closed-end rivet nut is sealed. Unlike open-end rivet nuts, the bolt cannot pass all the way through the body.
Can stainless steel threads seize during tightening?
Stainless steel threads can seize or become stuck during tightening. This is primarily due to factors such as material compatibility, friction, heat, installation speed, and torque control. The risk can be reduced by selecting appropriate material combinations, using compatible anti-seize lubricants, keeping the threads clean, and controlling the installation speed.
Can an installed rivet nut be reused after removal?
Once installed, rivet nuts cannot be reused after removal. This is because they undergo permanent plastic deformation upon installation. The deformation at the tail end is what clamps the sheet metal in place, and this deformation cannot be reversed.
Why does a rivet nut tool mandrel break?
There are several reasons why the pull rod of a rivet nut installation tool may break. Common causes include excessive installation load, incorrect tool settings, tool misalignment, insufficient thread engagement, or long-term wear on the pull rod itself.
Work with a IATF 16949 Certified Blind Rivet Manufacturer
Get High Quality Rivets Instead of Huck and Avdel Rivets

Rivmate Rivet
Rivmate is blind rivets manufacturers in china. The company is IATF 16949 certified and offers high-strength structural blind rivets that serve as alternatives to Huck and Avdel products.
Explore Rivmate Cases
Rivmate Rivet
Rivmate is blind rivets manufacturers in china. The company is IATF 16949 certified and offers high-strength structural blind rivets that serve as alternatives to Huck and Avdel products.

Hey There, I'm Allen!
I am the boss of Rivmate. For over two decades, we have specialized in the manufacture of blind rivets, providing our customers with reliable riveting solutions. Need riveting services? Feel free to contact us.