If, after installation, your rivet nuts exhibit problems such as damaged internal threads, free play, or loose connections, they must be removed and replaced. Knowing the correct method for removing and replacing rivet nuts can minimize damage to the sheet metal.
Next, I’ll walk you through the process of removing rivet nuts and selecting the right replacement parts in detail.
Table of Contents
Why Rivet Nuts Need to Be Removed
A rivet nut is a female threaded fastener installed in sheet metal or other suitable materials. Common reasons for removing a rivet nut include damage to the internal threads, slippage, a loose connection, structural deformation, and improper installation. When these issues compromise the reliability of the connection, the rivet nut must be removed and replaced.
| Reason for Removal | Common Signs | When Should You Remove It? | Important Considerations |
|---|---|---|---|
| Damaged Internal Threads | The bolt will not thread in properly, cannot tighten securely, or spins without gripping. | Remove and replace the rivet nut when its internal threads are damaged and can no longer provide a reliable threaded connection. | Check whether the damage is in the bolt or the rivet nut. A damaged bolt alone does not necessarily require rivet nut replacement. |
| Spinning or Loose Rivet Nuts | The rivet nut rotates inside the installation hole when you tighten or loosen the bolt, or the insert moves in the sheet material. | Inspect the rivet nut when it cannot remain securely fixed and the connection becomes unreliable. | Check the hole size, setting quality, and condition of the base material before choosing a replacement. |
| Incorrect Installation | The rivet nut is tilted, does not sit flush against the panel, is poorly secured, or shows visible deformation. | Removal is usually necessary if the insert is damaged, cannot be securely fixed, or cannot be corrected according to the manufacturer’s instructions. | Check the hole diameter, sheet thickness, grip range, and installation tool settings. Do not simply increase the setting force. |
| Corrosion or Physical Damage | Severe corrosion, cracked or deformed components, damaged threads, or visible damage around the joint. | Assess replacement when damage affects thread engagement, structural integrity, or connection reliability. | Minor surface rust does not automatically mean failure. Inspect the threads, rivet nut, surrounding material, and service environment. |
| Maintenance or Design Changes | A component must be replaced, a panel needs repair, or the existing fastening arrangement must be modified. | Removal may be necessary even when the rivet nut is undamaged, if the maintenance task requires it. | Removal may enlarge or damage the installation hole. Do not assume the removed rivet nut can be reused. |
Tools and Safety Equipment for Rivet Nut Removal
Before removing a rivet nut, you’ll need to prepare standard drill bits and a power drill. Since rivet nuts undergo plastic deformation after installation, forming a secure bond, you must first drill out the head before removing the body.
Metal rivet nuts can be drilled out directly. For rivet nuts made of other materials, select tools based on the material, head structure, installation location, and base material thickness. When using tools, control the drilling depth, protect the original mounting hole, and prevent metal shavings from causing injury.
Essential Tools for Rivet Nut Removal
| Tool | Purpose | Selection and Usage Tips |
|---|---|---|
| Electric Drill | Removes the rivet nut head so the remaining body can be separated from the workpiece. | Use a drill with controllable speed and maintain steady alignment. Avoid drilling deeper than necessary or damaging the base material. |
| Suitable Drill Bit | Cuts through the rivet nut head during removal. | Select the bit according to the head dimensions, fastener material, and removal method. Do not choose the drill bit diameter based on thread size alone. |
| Wrench or Screwdriver | Removes the bolt or screw installed in the rivet nut. | Use the correct tool for the fastener head. If the bolt causes the rivet nut to spin, stop and assess the connection before applying more force. |
| Clamp or Fixture | Secures the workpiece and prevents movement during drilling. | Secure the panel or component firmly before starting. Never rely on your hand alone to restrain a workpiece that could rotate. |
| Punch or Suitable Rod | Helps push the remaining rivet nut body out after its head has been removed. | Choose a suitable diameter and use controlled force to avoid damaging the hole edge or surrounding sheet material. |
| Deburring Tool or File | Removes sharp burrs around the installation hole. | Deburr carefully after removal. Avoid excessive material removal that could enlarge the hole or compromise the next installation. |
| Caliper | Measures the installation hole and base material thickness. | Check the hole diameter and panel thickness before selecting a replacement rivet nut. Inspect for deformation as well as dimensional changes. |
Safety Equipment for Rivet Nut Removal
| Safety Equipment | Purpose | Safety Considerations |
|---|---|---|
| Safety Glasses or Goggles | Protect the eyes from flying metal chips and debris. | Use appropriate eye protection with suitable coverage. Ordinary prescription glasses are not a substitute for protective eyewear. |
| Face Shield | Provides additional facial protection during grinding or operations that generate flying debris. | Wear it with safety glasses or goggles. A face shield alone does not replace eye protection. |
| Hearing Protection | Reduces exposure to noise from drills, grinders, and other power tools. | Use suitable earplugs or earmuffs when required by the noise level and working conditions. |
| Respiratory Protection | Helps protect against hazardous dust or coating particles when exposure is possible. | Assess the material and coating before work begins. Use appropriate dust controls and respiratory protection when needed. |
| Suitable Work Clothing | Reduces the risk of loose clothing, jewelry, or long hair becoming entangled in rotating equipment. | Tie back long hair, remove jewelry, and avoid loose clothing. Do not wear gloves near exposed rotating drill parts where they could become entangled. |
How to Protect the Panel and Existing Hole
When removing a rivet nut, the most important thing is not only to extract the damaged fastener but also to preserve the original dimensions and shape of the mounting hole as much as possible. This is because replacing the rivet nut with a new one requires a suitable hole diameter and the original sheet metal as a foundation to ensure a stable fastening.
If you damage the sheet metal or enlarge the mounting hole while drilling, it will be impossible to securely install the replacement rivet nut. Therefore, it is crucial to protect the sheet metal and the original mounting hole when removing a rivet nut.
Step 1:Prepare the Panel Before Removal
Before removal, clean dust, oil, and metal debris from the surface of the rivet nut to prevent it from shifting during drilling. Apply protective tape to the sheet metal surrounding the rivet nut to minimize scratches caused by tool slippage or friction from debris. Then secure the sheet metal to prevent it from moving during drilling.
Step 2:Control Drilling Position and Depth
Select an appropriate drill bit size based on the dimensions and structure of the rivet nut head, as well as the manufacturer’s removal instructions. Keep the drill bit steady while drilling, gradually removing material from the head. Use an appropriate depth stop or depth mark to control the drilling depth. Stop drilling immediately once the head has separated. Avoid cutting into the surrounding sheet metal or penetrating the panel.
Step 3:Remove the Remaining Body Without Enlarging the Hole
Remove the body of the rivet nut. Use a punch of appropriate size—smaller than the mounting hole—based on the installation structure. Apply controlled force to push the body out of the mounting hole. Be careful not to forcefully pry or repeatedly tap the body of the rivet nut. Doing so may cause dents in thin panels, deform the hole edges, or damage the back of the panel.
Step 4:Inspect the Existing Hole After Removal
After completely removing the rivet nut, first inspect the size of the mounting hole and the condition of the panel. It is best to use a caliper to measure the hole diameter and compare it to the dimensions specified in the manufacturer’s technical specifications. If the hole diameter, hole edges, and panel show no damage, you may use a suitable replacement part.
Method 1: Drill Out a Rivet Nut
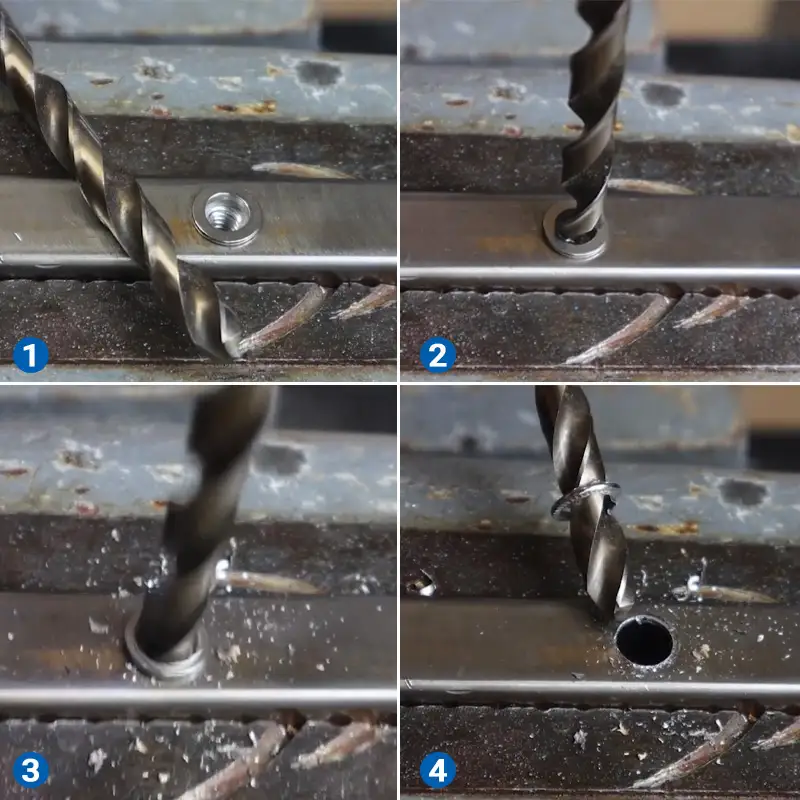
The drill-out method is a common technique for removing rivet nuts. When the internal threads are damaged and the rivet nut cannot be removed normally, the drill-out method is a highly effective solution. The process involves drilling out the head of the rivet nut to separate the body from the head, after which the remaining portion is removed.
- Step 1: Select the Appropriate Drill Bit
First, remove the bolts and secure the workpiece. Protect the back of the panel from any wires or other hidden components. Then, select the appropriate drill bit based on the size of the rivet nut’s head, the material, and the manufacturer’s removal instructions. - Step 2: Drill Out the Rivet Nut Head
Align the drill bit with the center of the head, holding it perpendicular to the panel surface. Control the drilling depth and carefully drill out the head. - Step 3: Remove the Remaining Body Using a Suitable Punch
- Step 4: Inspect the Mounting Hole
Method 2: Cut or Grind Off the Flange
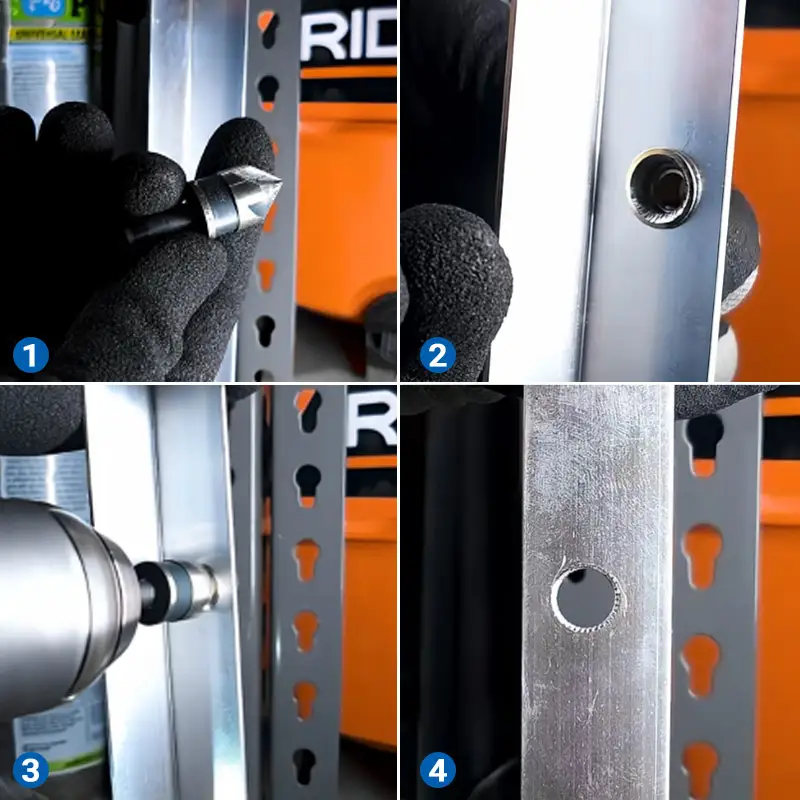
When the flange of a rivet nut is flush with the surface of the sheet metal, it cannot be removed directly with a drill bit. You can use a rotary cutting tool or an appropriate grinding tool to cut or grind away the flange, then remove the remaining body. This method is particularly suitable when you can safely control the cutting area and avoid damaging the surrounding sheet metal.
- Step 1: Secure the Workpiece
Secure the sheet metal to prevent it from moving during the operation, and ensure there is sufficient working space around the rivet nut. Then, wear safety goggles to protect against sparks generated by the cutting or grinding tool. - Step 2: Cut or Grind the Flange
Select a tool suitable for the rivet nut’s material and the flange’s structure, and slowly cut or grind away the flange. Keep the tool steady and avoid contact with the surrounding sheet metal. Stop immediately once the flange is separated from the body. - Step 3: Gently Remove the Body Using a Suitable Punch
How to Remove a Loose or Spinning Rivet Nut
If the rivet nut rotates along with the bolt when you tighten or remove it, this indicates that the rivet nut is not securely fastened and must be removed and replaced. Common causes of this slippage include an oversized mounting hole, insufficient riveting, or damage to the surrounding sheet metal. If you encounter these issues, you can remove the rivet nut by drilling off its head.
If the bolt cannot be removed normally and spins freely along with the rivet nut, use locking pliers to secure the rivet nut and prevent the bolt from coming out. Then, use an electric drill and an appropriate drill bit to remove the head. Keep the drill bit steady while drilling, and stop immediately once the head is separated from the body to avoid enlarging the mounting hole. After removing the head, use a suitable punch rod to gently push out the body of the rivet nut.
After removal, inspect the mounting hole and measure its diameter. If the original hole meets the installation requirements for a replacement rivet nut and the base material is intact, select a replacement part as needed. If the hole diameter has expanded or the sheet metal is damaged, do not install a new rivet nut of the same specification directly; instead, first evaluate an appropriate repair plan.
How to Remove the Collapsed Body from a Closed Cavity
Confirm the location and material of the remaining body inside the enclosed cavity, as well as whether there are any other accessible openings in the cavity. Never push the remaining body deeper into the cavity.
- If the remaining body is accessible through an existing opening, it can be carefully removed using a Flexible Retrieval Tool or a slender tool with a hook. If the rivet nut body is made of magnetic steel, we recommend using a Magnetic Pickup Tool. This method is not suitable for aluminum or stainless steel rivet nuts.
- When the opening of the enclosed cavity is small, you can use a slender gripper or a vacuum device with a narrow nozzle to assist with removal. If the exact location of the residual rivet nut cannot be determined, consider using an endoscope to aid in localization.
- If the remaining body is located in a completely enclosed space that cannot be accessed through existing openings, and it cannot be removed through the original installation hole using the methods described above, you will need to assess whether access to the cavity is possible through a service opening, a removable panel, or other reasonable maintenance methods. At the same time, care must be taken not to enlarge the original installation hole, as this could compromise the secure fastening of the replacement rivet nut.
Inspecting and Repairing the Hole After Removal
After removing the rivet nut, do not immediately install a replacement part. First, clean the hole and remove any burrs from the surrounding area. Then, check whether the shape and diameter of the original mounting hole are within the range recommended by the technical specifications.
If the mounting hole dimensions meet the requirements for the replacement rivet nut, you may consider continuing to use the original hole. The specifications of the new rivet nut must match the actual application.
If the hole diameter has expanded or the hole shape is significantly deformed, you should evaluate using a larger size or a specialized repair-type rivet nut approved by the manufacturer.
If cracks or severe deformation appear around the edges of the sheet metal, replacing the rivet nut alone will not resolve the issue. The sheet metal must be repaired or replaced.
How to Select and Install the Replacement Rivet Nut
Check whether the hole diameter, shape, edges, and surrounding sheet metal meet the standard requirements.
| Inspection Item | How to Check | Recommended Action |
|---|---|---|
| Hole Diameter | Measure the hole with a caliper and compare the result with the replacement rivet nut manufacturer’s specified hole diameter. | Confirm that the hole diameter meets the product requirements before installation. |
| Hole Shape | Check whether the hole has become oval or visibly deformed. | Assess whether repair is necessary if the hole is no longer properly shaped. |
| Hole Edge | Inspect for burrs, cracks, or visible damage around the edge. | Remove minor burrs carefully. Further assess any cracks or significant damage before reusing the hole. |
| Sheet Thickness | Measure the actual thickness of the base material. | Select a replacement rivet nut with a grip range suitable for the material thickness. |
Select the appropriate rivet nut size based on the sheet metal being used.
| Selection Factor | What You Need to Check |
|---|---|
| Thread Size | Confirm that the thread size and thread type match the mating bolt, such as metric or imperial threads. |
| Grip Range | Ensure the rivet nut’s grip range covers the actual material thickness. |
| Body Diameter | Make sure the body dimensions match the installation hole requirements. If the original hole has enlarged, do not automatically install the same size. |
| Material | Select steel, aluminum, stainless steel, or another suitable material based on the base material, corrosion environment, and connection requirements. |
| Body Style | Choose a round, knurled, hexagonal, or other suitable body style based on anti-rotation requirements and installation conditions. |
| Head Style | Select a flat head, large flange head, countersunk head, or other suitable style based on installation clearance and surface requirements. |
Install the replacement rivet nut. Remove any metal debris and burrs. Insert the rivet nut fully and correctly into the mounting hole, ensuring that the head is flush with the surface of the plate and not noticeably tilted. Use the appropriate installation tool and set the installation stroke or riveting force according to the manufacturer’s instructions. Activate the tool to form the correct clamping structure for the rivet nut. Inspect the installed rivet nut.
Preventing the Replacement from Loosening or Spinning
To prevent the replaced rivet nuts from loosening or spinning freely again, it is critical to ensure that the mounting holes are the correct size, the clamping range is appropriate, the rivet nut design is suitable for the base material, and the installation tool is set up correctly.
| Key Factor | Recommended Practice | Common Mistake |
|---|---|---|
| Hole Size | Ensure the hole meets the manufacturer’s specifications. | Reusing an oversized or damaged hole without repair. |
| Grip Range | Match the rivet nut’s grip range to the panel thickness. | Choosing the wrong grip range. |
| Body Style | Choose a suitable knurled or hexagonal body when additional resistance to rotation is needed. | Using a body style that does not match the hole design. |
| Installation Tool | Use the correct tool and follow the manufacturer’s instructions. | Applying too much or too little setting force. |
| Installation Check | Ensure the flange sits flush and the rivet nut does not spin. | Assuming the installation is secure based on appearance alone. |
FAQs
Are rivet nuts designed to be removable?
No. Once installed, a rivet nut remains permanently secured to the workpiece and is not designed to be repeatedly removed.
What drill bit size should I use to remove a rivet nut?
There is no single drill bit size that works for all models. You should select the appropriate drill bit based on the head design of the rivet nut, the size of the original mounting hole, and the manufacturer’s removal instructions.
Can I remove a rivet nut without damaging paint?
You can only try to minimize damage to the paint finish. It is impossible to guarantee that there will be absolutely no damage to the paint finish. When using the drill-out method, slippage or metal shavings can easily scratch the paint finish.
How do I stop a spinning rivet nut while drilling?
There are several methods for preventing rivet nuts from rotating: First, you can use a fixture to secure the sheet metal. Second, if there is sufficient exposed space at the head, you can use locking pliers to grip the rivet nut and prevent it from rotating.
Can the same hole be reused after removal?
The original mounting holes can still be used, provided that the hole diameter, shape, and surrounding base material meet the requirements specified by the manufacturer of the replacement rivet nuts.
What should I do if the hole becomes oversized?
If the mounting hole for a rivet nut becomes enlarged, measure the hole diameter and inspect the quality of the sheet metal; if appropriate, consider replacing it with a rivet nut of a larger outer diameter. However, if the hole edges are severely deformed, cracked, or lack sufficient strength, a repair or replacement plan must be evaluated; the rivet nut cannot simply be replaced with a new one.
Can a removed rivet nut be reused?
Removed rivet nuts cannot be reused. This is because rivet nuts undergo plastic deformation after installation.
Is a threaded insert removal tool necessary?
Not necessarily. You can use an electric drill and a drill bit of the appropriate size to remove it by drilling through the flange or head of the rivet nut.
Work with a IATF 16949 Certified Blind Rivet Manufacturer
Get High Quality Rivets Instead of Huck and Avdel Rivets
Rivmate Rivet
Rivmate is blind rivets manufacturers in china. The company is IATF 16949 certified and offers high-strength structural blind rivets that serve as alternatives to Huck and Avdel products.
Explore Rivmate Cases
Rivmate Rivet
Rivmate is blind rivets manufacturers in china. The company is IATF 16949 certified and offers high-strength structural blind rivets that serve as alternatives to Huck and Avdel products.

Hey There, I'm Allen!
I am the boss of Rivmate. For over two decades, we have specialized in the manufacture of blind rivets, providing our customers with reliable riveting solutions. Need riveting services? Feel free to contact us.